1、setup 语法糖
在vue3.2中我们不再需要进行return,当使用 <script setup> 的时候,任何在 <script setup> 声明的顶层的绑定 (包括声明的变量,函数声明,以及 import 引入的内容) 都可以在模板中直接使用,这是因为在setup函数中,所有的ES模板都被认为是暴露給上下文的值,并包含在setup()返回对象中。
要使用这个语法,需要将 setup 属性添加到 <script> 代码块上,示列:
<script setup>
import {ref} from 'vue'
let property = ref('12lyj');
</script>
这里面的代码会被编译成组件 setup() 函数的内容,这也就意味着与普通的 <script> 只在组件被首次引入的时候仅执行一次不同,<script setup> 中的代码会在每次组件实例被创建的时候执行。这一点非常的重要,也就是写在 <script setup> 中的代码,例如初始化的赋值等在组件每次实例创建时都重新执行一次。
2、组件自动注册
使用3.2的语法时,如果需要像之前一样去引入其他组件,就无需再通过components进行注册,我们可以直接引入使用。示列:
<template>
  <Hello/>
</template>

<script setup>
//这里我们引入了子组件 Hello
import Hello from './Hello.vue'


</script>
3、响应式数据创建 ref 和 reactive
ref
ref 用来给基本数据类型绑定响应式数据,访问时需要通过.value 的形式, template 会自动解析,不需要 .value
基本类型:除去Object,包括:String、Number、boolean、null、undefined
控制台打印数据结构为 RefImpl
<script setup>
// ref
const count = ref(0)

count.value++
console.log(count.value)
</script>
reactive
只能定义引用类型,即Object,包括:Object、Array、Date、function,定义基本类型时会警告

使用时,直接通过属性读写
<script setup>
// reactive
const state = reactive({
    count:0
})

state.count++
console.log(state.count)
</script>
reactive 默认对对象内的所有属性都进行响应式处理,并可以实现深层监听
该响应式能力是通过 ES6 Proxy实现的,其可以做到对属性的新增、删除监听,解决了 defineProperty的缺陷,并且对嵌套属性有着良好的支持,可以轻松实现 a.b.c.d=xx的响应式更新
<template>
  <div>
    <h2>{{ title }}</h2>
    <h4>{{ userInfo }}</h4>
  </div>
</template>
<script setup>
import { reactive, ref } from "vue";
const title = ref("hello,vue3");
const userInfo = reactive({
  name: "zhangsan",
  age: 18,
});
console.log(title.value);  // hello,vue3
console.log(userInfo.name);// zhangsan
console.log(userInfo.age); // 18
</script>
<style lang="scss" scoped></style>
4、toRef、toRefs、toRaw
toRef
如果我们只希望转换一个reactive对象中的属性为ref, 那么可以使用toRef的方法
let name2 = toRef(info, "name");
toRefs
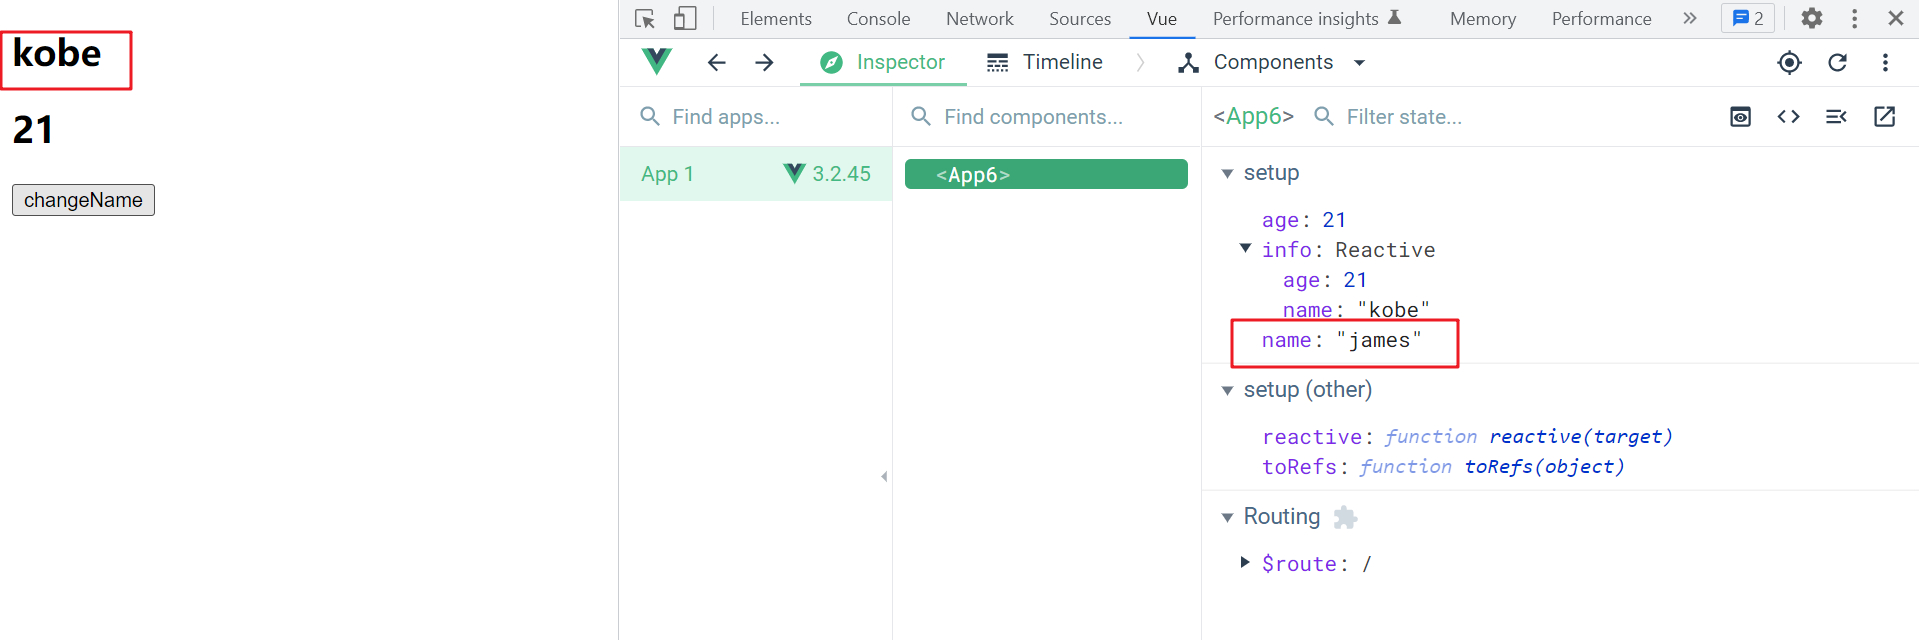
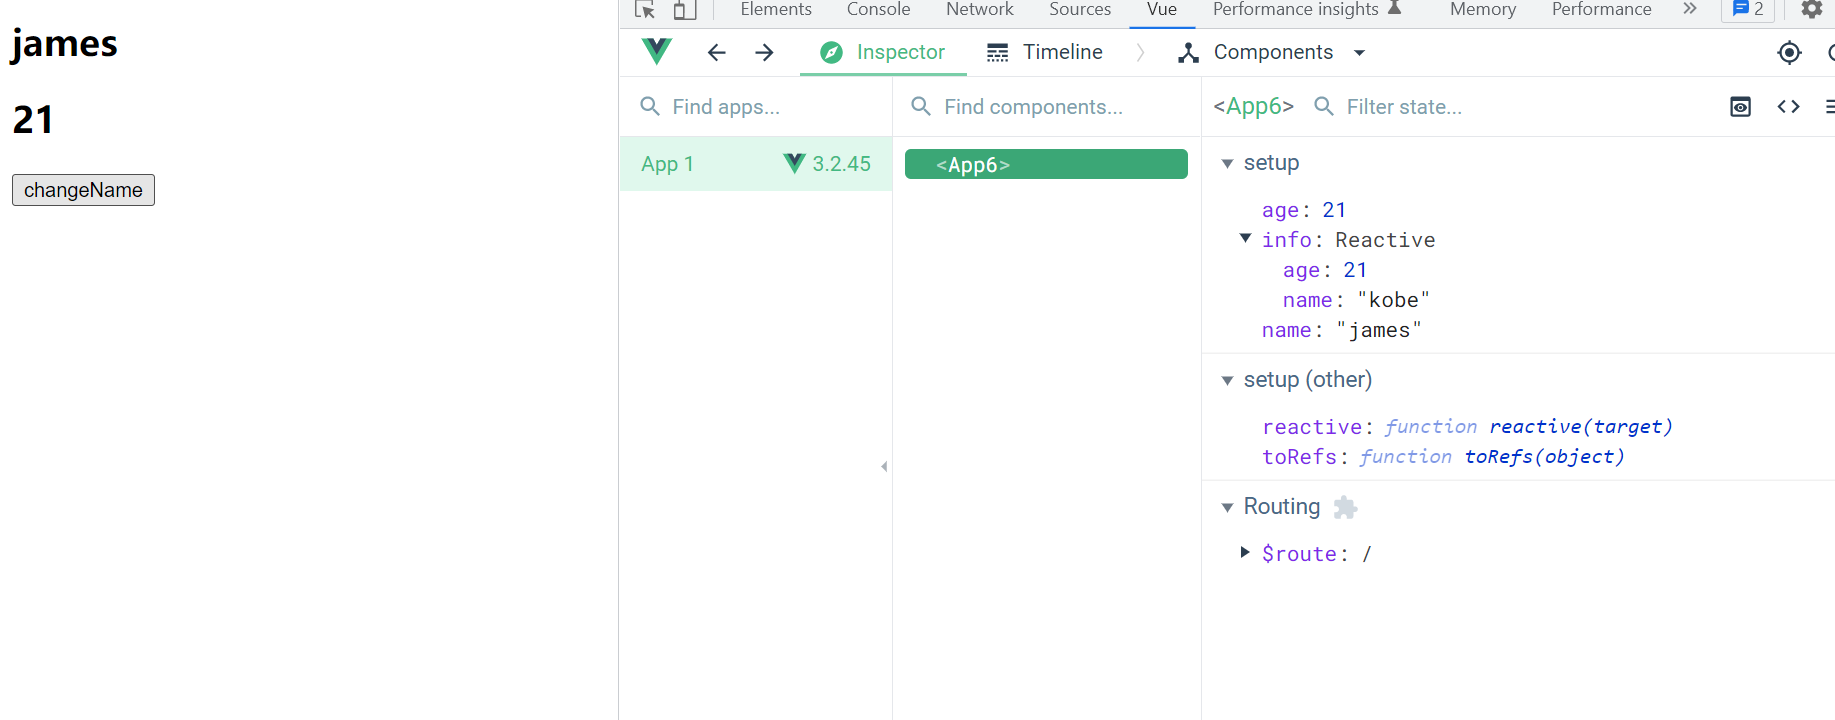
如果使用ES6的解构语法,对reactive返回的对象进行解构获取值,那么解构后的数据不再是响应式的
<template>
  <div>
    <h2>{{ name }}</h2>
    <h2>{{ age }}</h2>
    <!-- name变量不是响应式的 -->
    <button @click="name = 'james'">changeName</button>
  </div>
</template>
<script setup>
import { reactive } from "vue";
let info = reactive({
  name: "kobe",
  age: 21,
});
let { name, age } = info;
</script>
<style lang="scss" scoped></style>

Vue为我们提供了一个 toRefs 的函数,可以将reactive返回的对象中的属性都转成ref;
那么再次进行解构出来的 name 和 age 本身都是响应式的;
import { reactive, toRefs } from "vue";

let { name, age } = toRefs(info);

toRaw
将响应式对象修改为普通对象
<template>
  <div>
    <button @click="change">按钮</button>
    {{data}}
  </div>
</template>

<script setup lang="ts">
import { reactive, toRaw } from 'vue'

const obj = reactive({
  name: '树哥',
  age: 18
})

const data = toRaw(obj)

const change = () => {
  data.age = 19
  console.log('obj:', obj, 'data:', data);
}
</script>

可以看出数据能变化,视图不变化(失去响应式)
5、computed 计算属性
-
Options API中,我们是使用computed选项来完成的;
-
在Composition API中,我们可以在 setup 中使用 computed 方法来编写一个计算属性;
如何使用computed呢?
-
接收一个get函数,get函数的返回值是一个只能读 ref对象
-
接收一个具有 get 和 set 方法的对象,返回一个可读写ref 对象;
<template>
  <div>
    <h2>{{ fullName }}</h2>
  </div>
</template>
<script setup>
import { ref, computed } from "vue";
let firstName = ref("kobe");
let lastName = ref("bryant");
// 只有getter的写法
let fullName = computed(() => {
  return firstName.value + "-" + lastName.value;
});


</script>
<style lang="scss" scoped></style>
<template>
  <div>
    {{ fullName }}
    <button @click="fullName = 'liu yingjie'">set fullName</button>
  </div>
</template>
<script setup>
import { ref, computed } from "vue";

const firstName = ref("John");
const lastName = ref("Doe");

const fullName = computed({
  // getter
  get() {
    return firstName.value + " " + lastName.value;
  },
  // setter
  set(newValue) {
    // 注意:我们这里使用的是解构赋值语法
    [firstName.value, lastName.value] = newValue.split(" ");
  },
});
</script>

<style lang="scss" scoped></style>

如果执行 this.fullName = 'liu yingjie',computed 的 set 就会调用,firstName 和 lastName 会被赋值为 liu和 yingjie。
6、侦听属性 watch 和 watchEffect
-
Options API中,我们可以通过watch选项来侦听data或者props的数据变化,当数据变化时执行某一些操作
-
在Composition API中,我们可以使用 watch 和 watchEffect 来完成响应式数据的侦听
- watch:需要手动指定侦听的数据源;
- watchEffect:用于自动收集响应式数据的依赖;
watch的使用
watch需要侦听特定的数据源,并且执行其回调函数。当被侦听的数据发生变化时会执行回调
<template>
  <div>
    <h2>{{ counter }}</h2>
    <button @click="counter++">+1</button>
  </div>
</template>
<script setup>
import { watch, ref } from "vue";
let counter = ref(100);
watch(counter, function (newValue,oldValue) {
  console.log("newValue: ", newValue);
  console.log("oldValue: ", oldValue);
});
</script>
<style lang="scss" scoped></style>

侦听多个源
<template>
  <div>
    <h2>{{ counter }}</h2>
    <button @click="counter++">+1</button>
  </div>
</template>
<script setup>
import { watch, ref } from "vue";
let counter = ref(100);
let age = ref(22);
// 侦听counter, age
watch([counter, age], function (newValue) {
  console.log("newValue:", newValue);
});
</script>
<style lang="scss" scoped></style>

deep、immediate选项
- deep:强制转成深层侦听器
- immediate:表示在watch中首次绑定的时候,是否执行handler。值为true则表示在watch中声明的时候,就立即执行handler方法,值为false,则和一般使用watch一样,在数据发生变化的时候才执行handler。
<template>
  <div>
    <h2>{{ info.name }}</h2>
    <button @click="info.name = 'james'">修改name</button>
  </div>
</template>
<script setup>
import { watch, reactive } from "vue";
let info = reactive({ name: "kobe", age: 25 });
watch(
  info,
  (newValue) => {
    console.log("newValue: ", newValue);
  },
  {
    deep: true,
    immediate: false,
  }
);
</script>
<style lang="scss" scoped></style>
watchEffect
-
watchEffect传入的函数会被立即执行一次,并且在执行的过程中会自动收集依赖
-
只有收集的依赖发生变化时,watchEffect传入的函数才会再次执行
<template>
  <div>
    <h2>{{ fullName }}</h2>
    <button @click="changeName">修改name</button>
  </div>
</template>
<script setup>
import { ref, watchEffect } from "vue";
let firstName = ref("kobe");
let lastName = ref("bryant");
let fullName = ref("");
// 立即执行一次
watchEffect(function () {
  fullName.value = firstName.value + "-" + lastName.value;
});
// 修改firstName与lastName时,watchEffect函数会再次执行
function changeName() {
  firstName.value = "lebron";
  lastName.value = "james";
}
</script>
<style lang="scss" scoped></style>
watchEffect的停止侦听
如果在发生某些情况下,我们希望停止侦听,这个时候我们可以获取 watchEffect 的返回值函数,调用该函数即可 (调用watch的返回函数也可停止监听)
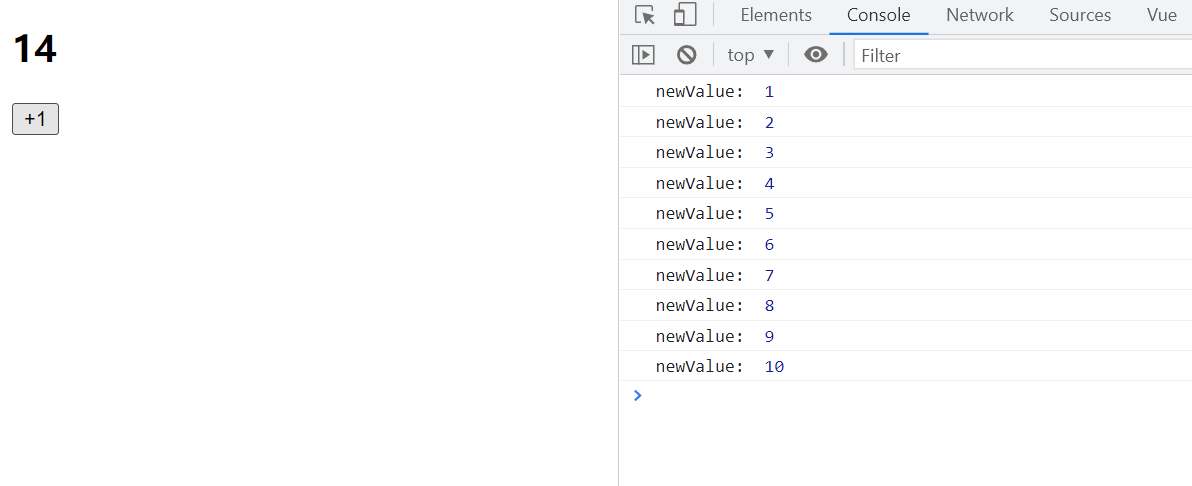
- 案例:当counter值到达10,停止监听
<template>
  <div>
    <h2>{{ counter }}</h2>
    <button @click="inc">+1</button>
  </div>
</template>
<script setup>
import { ref, watchEffect } from "vue";
let counter = ref(0);
const stopwatch = watchEffect(function () {
  console.log("newValue: ", counter.value);
});
function inc() {
  counter.value++;
  if (counter.value > 10) {
    stopwatch();
  }
}
</script>
<style lang="scss" scoped></style>

7、defineProps 自定义
用来接收父组件传来的 props(父传子)
代码示列:
- 子组件 Son 代码:
<template>
  <h2>我是子组件----Son</h2>
  <div>{{ props.title }}</div>
</template>

<script setup>
import { defineProps } from "vue";

//接收父组件 传过来的值
const props = defineProps({
  title: {
    type: String,
    default: "hello",
  },
});

//打印一下 接收父组件的值
console.log(props.title); //父的值
</script>
- 父组件 APP 代码:
<template>
  <div>
    <h2>我是父组件----App</h2>
    <son :title="title"></son>
  </div>
</template>
<script  setup>
import { ref } from 'vue';
import Son from './components/Son.vue';

const title = ref('我是你爹')
</script>
<style lang='scss' scoped>

</style>
8、defineEmit 自定义事件
子组件向父组件事件传递(子传父)
代码示列:
- 子组件代码:
<template>
  <hr />
  <div>我是子组件----Son2</div>
  <button @click="toEmits">点击传到父组件</button>
</template>

<script setup>
import { defineEmits, ref } from "vue";

//先定义再发送值
const emits = defineEmits(["getChil"]);

const toEmits = () => {
  emits("getChil", "儿子的值");
};
</script>
- 父组件代码:
<template>
  <div>
    <h2>我是父组件----App</h2>
    <son-2 @getChil="getChil"></son-2>
    <div>{{ data }}</div>
  </div>
</template>
<script setup>
import { ref } from "vue";
import Son2 from "./components/Son2.vue";

//空值接收 子组件的传值
let data = ref(null);
const getChil = (e) => {
  data.value = e;
  console.log(e); //子组件的值
};
</script>
<style lang="scss" scoped></style>
9、defineExpose 暴露属性
组件暴露出自己的属性
在setup中如何使用ref获取元素或者组件?
-
其实非常简单,我们只需要定义一个ref对象,绑定到元素或者组件的ref属性上即可
-
组件内的属性或方法不会对外曝露,无法访问组件内的属性与方法
在标准组件写法里,子组件的数据都是默认隐式暴露给父组件的,但在script-setup模式下,所有数据只是默认return给template 使用,不会暴露到组件外,所以父组件是无法直接通过挂载ref 变量获取子组件的数据。如果要调用子组件的数据,需要先在子组件显示的暴露出来,才能够正确的拿到,这个操作,就是由defineExpose来完成。
子组件代码:
<template>
  <div>我是子组件----Son3></div>
</template>

<script setup>
import { ref, defineExpose, reactive } from "vue";

let sonInfo = reactive({
  name: "zhangsan",
  age: 18,
});

let title = ref("Son3的标题");

defineExpose({
  sonInfo,
  title,
});
</script>
父组件代码:
<template>
  <button @click="shiEmots">获取暴露</button>
  <son-3 ref="shield" />
</template>
<script setup>
import Son3 from "./components/Son3.vue";
import { ref } from "vue";

const shield = ref();

const shiEmots = () => {
  //子组件接收暴露出来得值
  console.log("接收reactive暴漏出来的值", shield.value.sonInfo);
  console.log("接收ref暴漏出来的值", shield.value.title);
};
</script>
结果:

10、Provide / Inject
provide 可以在祖先组件中指定我们想要提供给后代组件的数据或方法,而在任何后代组件中,我们都可以使用 inject 来接收 provide 提供的数据或方法。
- provide可以传入两个参数:
- name:提供的属性名称;
- value:提供的属性值;
<template>
  <div>
    <h2>这是祖先-----App组件</h2>
    <Son4></Son4>
  </div>
</template>
<script setup>
import Son4 from "./components/Son4.vue";
import { provide, ref } from "vue";
let title = ref("二十大");
provide("title", title);
</script>
<style scoped></style>
- 在 后代组件 中可以通过 inject 来注入需要的属性和对应的值,inject可以传入两个参数:
- 要 inject 的 property 的 名称;
- 默认值;
<template>
  <div>
    <h2>我是子组件----Son4</h2>
    <h2>{{ title }}</h2>
  </div>
</template>
<script setup>
import { inject } from 'vue'
const title = inject('title', '默认值')

</script>
<style scoped></style>
11、hook函数
介绍:
- Vue3 的 hook函数 相当于 vue2 的 mixin, 不同在与 hooks 是函数
- Vue3 的 hook函数 可以帮助我们提高代码的复用性, 让我们能在不同的组件中都利用 hooks 函数
示列 :
1、首先我们需要创建一个hooks的文件
2、在hooks文件下,我们创建一个我们需要使用的.js文件 这里我们比如时usePoint.js
这里我们在usePoint里面写了一个获取鼠标点击位置的方法
代码示列:
import {reactive, onMounted, onBeforeUnmount} from 'vue'
export  default function () {
    //展示的数据  可以通过App.vue 界面去隐藏
    let point = reactive({
        x: 0,
        y: 0
    })

    //获取鼠标点击事件
    function savePonint(event) {
        point.x = event.pageX
        point.y = event.pageY
        console.log(event.pageX, event.pageY)
    }

    //现实之后调用 挂载完毕
    onMounted(() => {
        window.addEventListener('click', savePonint)
    })

    //在隐藏之前调用 卸载之前
    onBeforeUnmount(() => {
        window.removeEventListener('click', savePonint)
    })

    return point
}
我们在组件中引入此文件 代码示列:
<template>

  <h2>当前求和:{{ sum }}</h2>
  <button @click="sum++">点我加一</button>
  <hr>
  <h2>当前鼠标点击坐标为:x:{{ point.x }},y:{{ point.y }}</h2>
</template>

<script>
import {ref} from 'vue'
//复用的usePoint
import usePoint from "../hooks/usePoint";

export default {
  name: 'App',
  setup() {
    //数据
    let sum = ref(0)
    let point = usePoint()
    return {sum,point}
  },
}
</script>


评论区